



Tana Outliner for desktop reads a file called custom.css from its application data folder every time a window finishes loading, and injects it at the end of the page. Because it lands last, your rules win over the app's own styles without needing !important everywhere.
This is desktop only. The browser version of Tana Outliner and the mobile apps do not read custom.css, so any changes you make here follow the desktop app and nothing else. In a browser, third-party extensions that inject user stylesheets can apply similar CSS to the web app, though they are outside Tana's control and equally unsupported.
What you can reasonably change
There are two very different levels here, and the difference matters a lot for how long your work survives.
Theme variables are the stable-ish level. Tana Outliner builds its interface out of CSS custom properties like --colorCanvasBackground and --colorEditorText, set on the <html> element under html.isDarkMode or html.isLightMode. Overriding these is the closest thing to an intended use: you are re-tinting the app through the same knobs it uses on itself. Variables do get renamed and retired, but far less often than markup changes.
Internal selectors are the fragile level. Class names like .bulletSide and data attributes like data-tag-name are implementation details. They are not a public API, nobody keeps them stable for you, and they can disappear in a routine refactor. Everything in the advanced patterns section is at this level.
If you can do what you want with variables, do it with variables.
Set it up
Find your application data folder
Tana Outliner stores custom.css alongside its other settings:
| Platform | Folder |
|---|---|
| macOS | ~/Library/Application Support/Tana Outliner/ |
| Windows | %APPDATA%\Tana Outliner\ |
| Linux | ~/.config/tana-outliner/ |
On macOS, ~/Library is hidden in Finder. Use Go → Go to Folder (⇧ ⌘ G) and paste the path.
Start from the example file
The first time Tana Outliner starts without a custom.css, it drops a custom.css.example into that folder for you. It is a working stylesheet that restores the app's older color scheme, and it doubles as a reference for how theme variables are meant to be overridden.
If you do not see it, quit Tana Outliner fully and reopen it. The example is only written when no custom.css is present.
Rename it to custom.css
Copy custom.css.example to custom.css in the same folder. Keep the original .example file: it is your known-good starting point and your fastest way back if something goes wrong.
Nothing happens yet. The file is only read when a window loads.
Reload Tana Outliner
Press ⌘ R (macOS) or Ctrl R (Windows and Linux), or use View → Reload.
A reload is enough. You do not need to quit and reopen the app. This is what makes iterating bearable: edit the file in your editor, switch to Tana Outliner, reload, look. If a reload does not seem to pick up your changes, a full restart is the next thing to try.
Work safely
Custom CSS can hide things you need, including the controls you would use to fix the problem. A few habits keep that from becoming a bad afternoon.
Keep a backup. Before a big edit, copy your working file to custom.css.backup in the same folder. Tana Outliner ignores any filename that is not exactly custom.css, so backups sit harmlessly next to it.
Change one thing at a time. Add a single rule, reload, look at the result. A stylesheet built in small verified steps is one you can debug. Forty rules pasted in at once is not.
Comment as you go. Six months from now you will not remember why a rule exists, and internal selectors give you no clue on their own.
/* Dim bullets on document-style pages. Uses internal class names -
   recheck after each Tana Outliner update. Added 2026-08-27. */
Test in a scratch area first. Try new rules on a throwaway node or workspace before pointing them at content you rely on.
Turn it off and roll back
Custom CSS is only active while a file named exactly custom.css exists. So the off switch is a rename:
- Rename
custom.csstocustom.css.off(any other name works) - Reload Tana Outliner
You are back to stock. Nothing about your workspace, data, or settings is touched, because custom CSS only ever affects how the app is drawn on your machine.
Two other ways to get back to a clean state:
- Empty the file. Tana Outliner ignores a
custom.cssthat is blank or only whitespace, so deleting its contents also disables it. - Comment out the suspect rule. Wrap it in
/* … */, reload, and see if the problem goes away. This is how you find which of forty rules is the culprit.
Recolor the interface with theme variables
This is the approach to reach for first. Set variables on html.isDarkMode and html.isLightMode and the whole interface follows, because those are the same variables the app's own stylesheets read.
html.isDarkMode {
  --colorCanvasBackground: #16181d;
  --colorPanelBackground: #1d2027;
  --colorEditorText: #d6d9de;
}

html.isLightMode {
  --colorCanvasBackground: #f2f1ed;
  --colorPanelBackground: #ffffff;
  --colorEditorText: #2b2b2b;
}
Color variables worth knowing. These belong under html.isDarkMode and html.isLightMode, because each theme sets its own value:
| Variable | Controls |
|---|---|
--colorCanvasBackground | The backdrop behind panels |
--colorPanelBackground | Panel and page surfaces |
--colorPanelBackgroundDimmed | Secondary panel surfaces |
--colorEditorText | Body text in the outline |
--colorLink | Link color |
--colorSelectionSecondaryBackground | Selected node highlight |
--colorBulletDefaultFill | Bullet fill |
--colorBulletDefaultOutline | Bullet outline |
Sizing variables are a separate family. They are not theme-specific, so set them on plain html and they apply in both light and dark:
| Variable | Controls | Default |
|---|---|---|
--baseFontSize | Base interface font size | 15px |
--defaultOutlineIndentation | Indent per outline level | 1rem |
--sideBarWidth | Sidebar width | 15rem |
--bulletDiameterOuter | Bullet hit area size | 15px |
--bulletDiameterInner | Visible bullet dot size | 5px |
html {
  --defaultOutlineIndentation: 1.4rem;
  --sideBarWidth: 18rem;
}
Tana Outliner defines several hundred of these. To find the one behind a specific piece of interface, use the element inspector and read the computed styles: the variable names appear directly in the rules.
Two rules of thumb. Set variables at the html.isDarkMode / html.isLightMode level rather than on individual components, so the change stays consistent everywhere. And define both themes, or your styling will look broken to you the first time you switch.
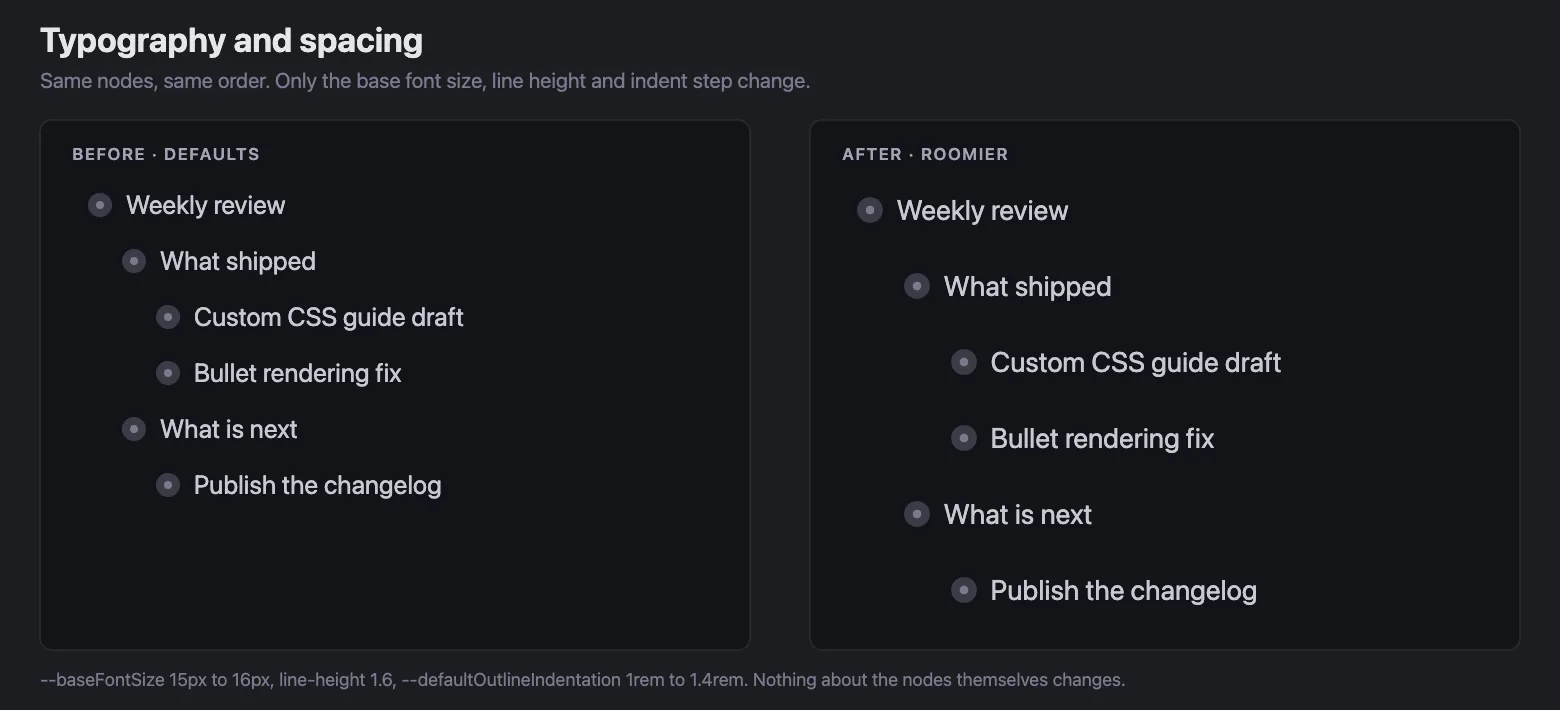
Adjust typography and spacing
html {
  --baseFontSize: 16px;
  --defaultOutlineIndentation: 1.4rem;
}

/* Roomier lines in the outline */
[data-is-node-container] {
  line-height: 1.6;
}
Restyle the progress bar
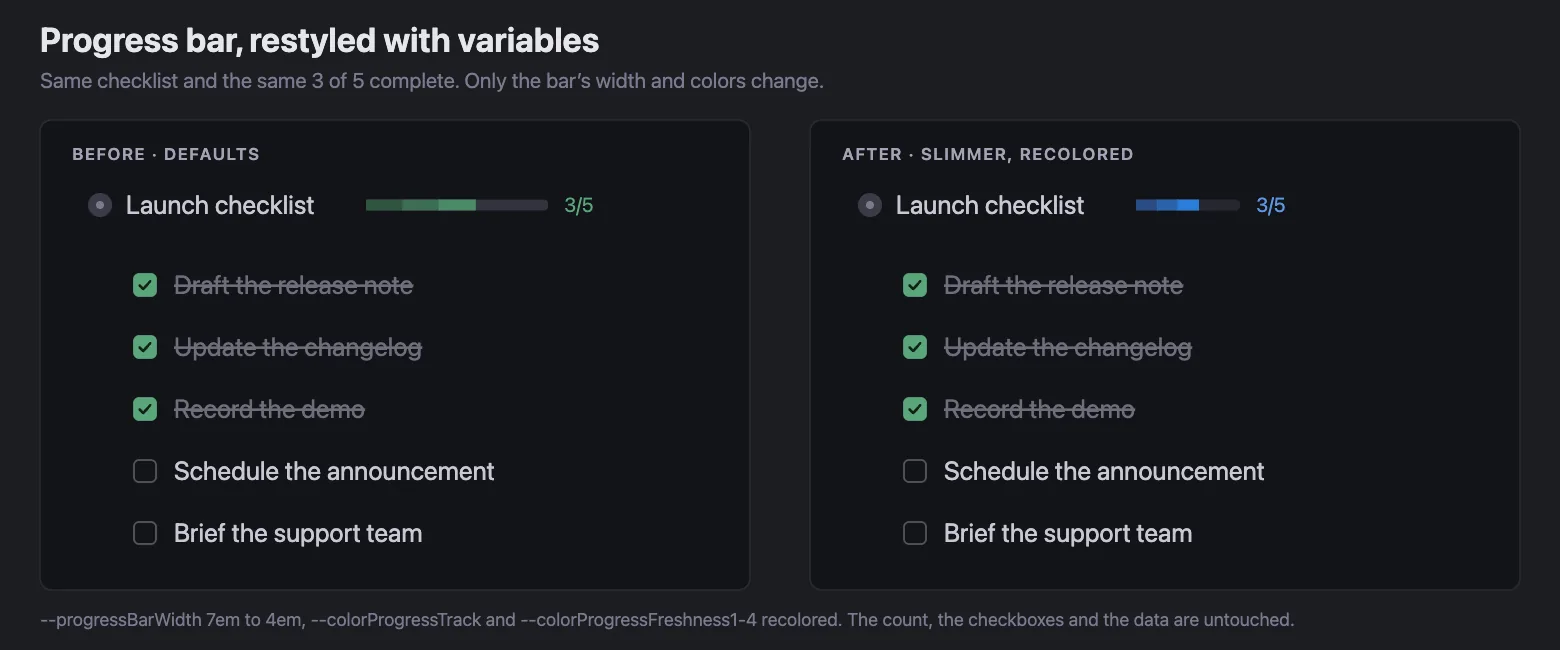
Nodes with checkboxes beneath them grow a progress bar. Its width and colors are variables, so you can slim it down or recolor it without touching a selector:
html {
  /* default is 7em */
  --progressBarWidth: 4em;
}

html.isDarkMode {
  --colorProgressTrack: #26272f;
  --colorProgressFreshness1: #284c82;
  --colorProgressFreshness2: #2b64ac;
  --colorProgressFreshness3: #297dd9;
  --colorProgressFreshness4: #5c97e5;
}
The four Freshness variables are the bar's fill, banded by how recently each chunk of work was completed. Freshness4 also colors the count next to the bar.
Advanced: tag-scoped styling
Tana Outliner puts the node's supertag on its container element, which lets you style nodes by tag:
/* Every node tagged #book */
[data-tag-name="book"] {
  border-left: 2px solid var(--colorLink);
  padding-left: 0.5rem;
}
Three things to know before you lean on this:
- The name must match exactly, including case, and it changes when you rename the supertag.
data-tag-idis more durable. The same element also carries the supertag's internal ID, which survives renames. It is unreadable, but it does not break when someone tidies up a tag name.- Only one tag shows up. A node with several supertags exposes just the first one here, so
[data-tag-name="book"]will miss a node where#bookis not the first tag.
Approximate a document view with a #Document tag
A document view, where a page reads as flowing prose instead of a bulleted outline, is something people have asked Tana Outliner for repeatedly, and it does not exist as a built-in feature. What follows is not that feature. It is a workaround that gets you a good part of the way there using nothing but CSS, and it is worth understanding as an illustration of the technique rather than as something to depend on.
The idea: tag a node #Document, then fade the bullets on everything nested under it. The content, the indentation, and every outline behavior stay exactly as they were. Only the bullet visuals change, so what you get is an outline that reads like a document while still working like an outline.
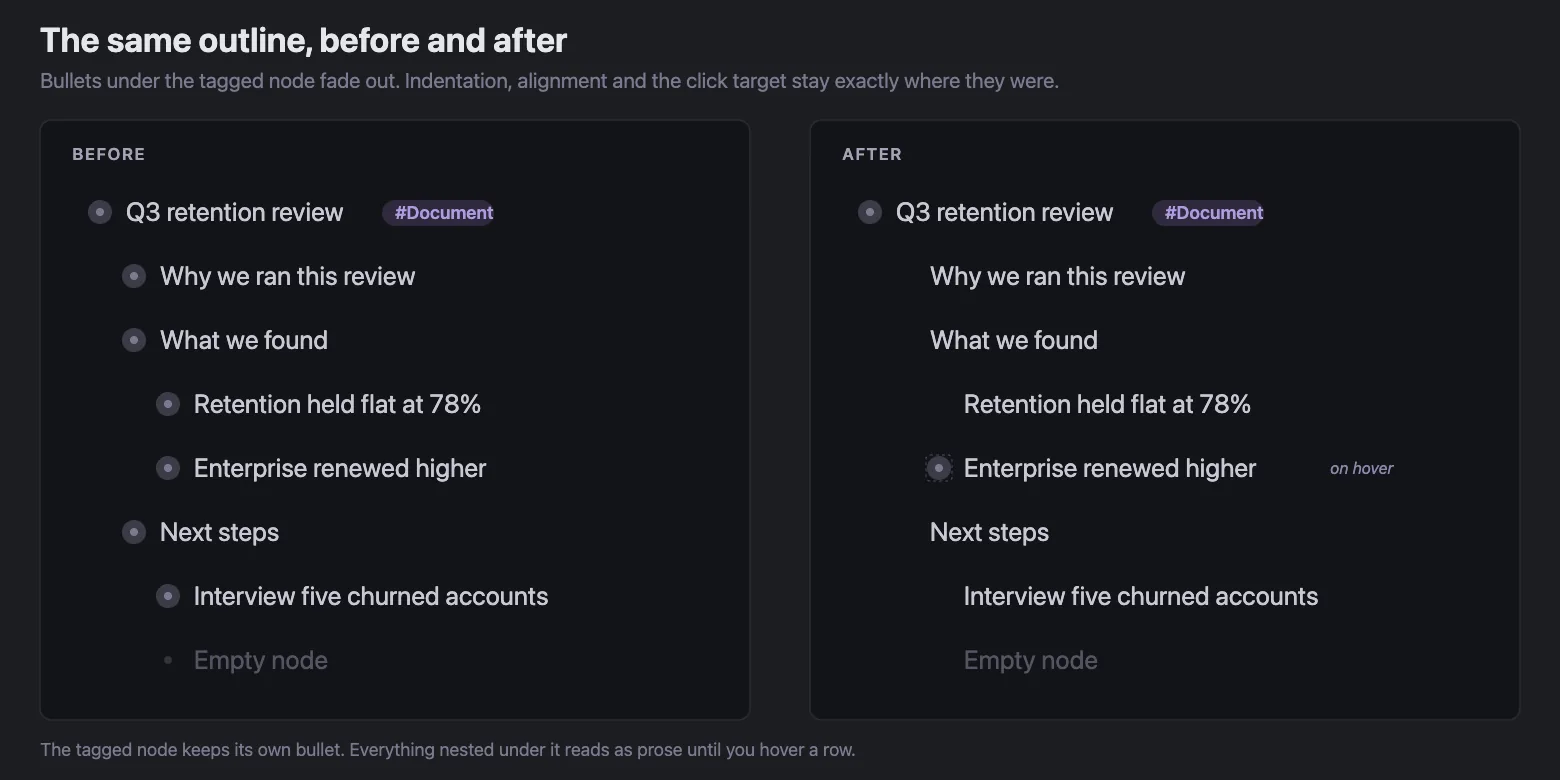
/* Fade bullets for everything inside a #Document node.
   Internal class names - recheck after Tana Outliner updates. */
[data-tag-name="Document"] [data-is-node-container] .bulletSide > .bullet,
[data-tag-name="Document"] [data-is-node-container] .placeHolderEmptyBullet {
  opacity: 0;
  transition: opacity 200ms ease-out;
}

/* Bring them back on hover so the outline is still usable */
[data-tag-name="Document"] [data-is-node-container]:hover .bulletSide > .bullet,
[data-tag-name="Document"] [data-is-node-container]:hover .placeHolderEmptyBullet {
  opacity: 1;
}
Why it is written this way:
- Scoped to descendants.
[data-tag-name="Document"] [data-is-node-container]reaches the nodes inside a Document-tagged node, so child content keeps rendering normally and only the bullet visuals change. opacity, notdisplay: none. The bullet keeps its box, so indentation, alignment, and the click target for zooming and expanding all still work. Removing the element instead collapses the layout and takes the click target with it.- Both bullet elements.
.bulletSide > .bulletis the bullet on a normal node;.placeHolderEmptyBulletis the placeholder dot on an empty one. Style one and not the other and empty lines will still show a dot. - Hover restores them. This mirrors what Tana Outliner already does elsewhere when it dims bullets, and it means you have not actually lost any functionality.
What it does not give you is worth being clear about. This changes appearance and nothing else. You do not get document-style typography, paragraph spacing, a page width, or any change to how the content is stored, exported, or published. Nodes are still nodes. If you want more of the look, you can keep layering rules onto the same [data-tag-name="Document"] scope, but every rule you add is another thing to recheck after an update.
Find the right selector
Tana Outliner for desktop ships with the standard element inspector:
- Open View → Toggle Developer Tools, or press ⌥ ⌘ I on macOS, Ctrl ⇧ I on Windows and Linux
- Click the inspect-element arrow, then click the thing you want to change
- Read the class names and data attributes on the highlighted element
- Edit styles live in the inspector until it looks right
- Move the rules that worked into
custom.cssand reload
Working in the inspector first is much faster than the edit-reload loop, and it costs you nothing when an experiment fails.
Prefer data attributes over class names where you have the choice. Attributes like data-is-node-container describe what an element is and tend to outlive class names, which get renamed during styling work.
Matching generated class names
Not every class name in the inspector is one you can type into a stylesheet. Much of the interface is styled with CSS Modules, which produce two-part class names: a readable prefix taken from the file and the local class, then a short generated hash.
NodeProgressBar_progress__aB3dE
^^^^^^^^^^^^^^^^^^^^^^^^^^      prefix, stable
                          ^^^^^ hash, changes when the file changes
Copying the whole thing is the fragile move. The hash is derived from the file's contents, so it changes the next time anyone edits that file's styles, and your rule quietly stops applying. The prefix is the durable half, so match on that instead:
/* ^= means "starts with" */
[class^="NodeProgressBar_progress__"] {
  opacity: 0.6;
}
Keep the trailing __ in the fragment. It marks the boundary between prefix and hash, and without it you risk matching a longer class that merely starts the same way.
When ^= will not match. ^= tests the class attribute from its very first character, so it only works when your target class is the first one on the element. Plenty of components put it last. The progress bar is one: its inner element comes from a shared layout component that emits its own utility classes before passing yours through, so the real attribute looks like this, and ^= misses it entirely:
class="tw-flex tw-flex-row tw-items-center NodeProgressBar_progress__aB3dE"
For those, use *=, which looks anywhere in the attribute:
/* *= means "contains anywhere" */
[class*="NodeProgressBar_progress__"] {
  opacity: 0.6;
}
Reach for *= only when the fragment can appear somewhere other than the start, because it is the broader tool: it matches any element whose class attribute contains that substring, including ones you never intended. Keep the fragment long and specific, and scope it to an ancestor you trust when you can:
[data-is-node-container] [class*="NodeProgressBar_progress__"] {
  opacity: 0.6;
}Troubleshooting
Nothing happens after a reload. Check the filename is exactly custom.css, with no .txt or .example extension hiding behind your operating system's "hide known file types" setting. Check it is in the folder from step one, not next to the application itself. Confirm the file is not empty, and that you are in the desktop app rather than a browser tab.
Some rules apply and others do not. Almost always specificity. Your stylesheet is injected last, so it wins ties, but a more specific app rule still beats a less specific one of yours. Inspect the element, find the rule that is winning, and match its specificity. Reach for !important last: it makes the next problem harder to debug.
The interface looks broken. Rename custom.css to custom.css.off, reload, and confirm it is your stylesheet. Then bisect: comment out half the file, reload, and keep halving until you find the rule.
It worked before an update. Expected, unfortunately, if you are using internal selectors. Inspect the element again and see what the markup is now. This is the maintenance cost of this feature.
It works on my desktop but not on mobile or in the browser. Working as intended. custom.css is read by the desktop app only.
Before you report a bug
Rename custom.css to custom.css.off, reload Tana Outliner, and check whether the problem is still there. Custom CSS can produce symptoms that look exactly like app bugs, and support cannot tell the difference from the outside. If the problem survives with custom CSS disabled, it is a real bug and worth reporting.